
A smart Street Glide first-stage build should not start with the flashiest part. It should start with the complaint you actually have on the bike: sore body, weak audio at speed, wind noise, poor night visibility, or traffic not noticing you.
That is the difference between a Street Glide that only looks modified and a Street Glide that rides better every time you take it out. Use this guide to choose your first round of Harley-Davidson Street Glide upgrades without buying parts in the wrong order.
Start your search in these SpazCycle collections, then narrow by year, trim, and the problem you are trying to solve:
Seats & Sissy Bars Windshields & Fairings Audio Communication & Mounts Lighting Exhaust Sale
Quick answer: pick the first upgrade by complaint
If your back, hips, tailbone, knees, or passenger are the problem: start with comfort. Look at seat shape, rider pocket, extended reach, passenger space, windshield height, and bar reach before audio or exhaust.
If the stereo disappears above highway speed: do not automatically buy bigger speakers first. Fix wind noise and cockpit turbulence, then buy a matched speaker and amp kit for your exact Street Glide year.
If you ride at night or in traffic: start with functional visibility. Headlight output, front running/turn lights, rear brake/turn lights, and side visibility matter more than cosmetic accent lighting.
Before buying anything, baseline the bike. Check tires, brake condition, battery health, charging output, rear preload, loose fairing hardware, loose saddlebag hardware, exhaust leaks, and headlight aim. A bolt-on part should fix a real complaint, not cover up a service issue.
If comfort is the complaint: fix the rider triangle first
Street Glide comfort is more than soft foam. A seat can move you forward or back, change your knee bend, improve lower-back support, change reach to the bars, and make passenger complaints better or worse. That is why seat choice should start with the pain point, not the stitch pattern.
Use this order before buying comfort parts:
- Decide whether the pain is tailbone pressure, lower-back fatigue, cramped knees, bar reach, passenger discomfort, or wind fatigue.
- Choose standard reach or extended reach before choosing upholstery style.
- Check windshield height after changing seats because your head position may change.
- Set rear preload for solo, two-up, or loaded riding before blaming the seat for every harsh bump.

Saddlemen Step-Up Tuck-n'-Roll Seat
Good first look when the rider wants a stronger pocket, 6-inch lumbar support, Gel-Core / Ultra-Foam comfort, and a sport-touring feel instead of a flat stock-style seat.
Street Glide fitment shown: 2024–2026 Street Glide FLHX/FLHXS, 2025 Street Glide Ultra, 2023–2026 CVO Street Glide, and 2026 Street Glide Limited/ST applications listed on the product page.
View fitment & price
Saddlemen Step-Up Full Lattice Extended Reach Seat
Use extended reach when the stock cockpit feels tight. This is not just a style choice; it is for riders who need more room before they start changing bars.
Street Glide fitment shown: 2024–2026 Street Glide FLHX/FLHXS, 2025 Street Glide Ultra, 2023–2026 CVO Street Glide, and 2026 Street Glide Limited/ST applications listed on the product page.
View fitment & price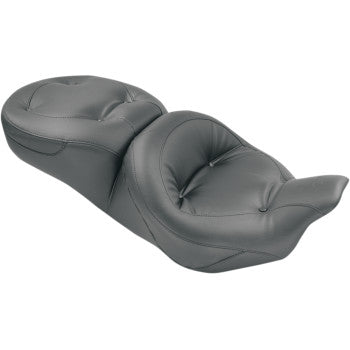
Mustang One-Piece 2-Up Regal Ultra Touring Seat
Compare this direction if you want a wider, traditional touring-style seat instead of a stepped sport-touring pocket. It is especially worth a look for two-up riders.
Street Glide fitment shown: 2008–2021 Street Glide FLHX/FLHXS and related FLT Touring applications listed on the product page.
View fitment & priceDo not ignore wind when you are chasing comfort
Wind can make a good seat feel worse. If the shield throws dirty air into your helmet, your neck, shoulders, and upper back work harder. That also makes audio feel weaker because the speakers are fighting wind roar.

Klock Werks 11.5-Inch Clear Flare Windshield
Start here if helmet shake, wind noise, or long-ride fatigue is the complaint. A taller, shaped shield can be a better first upgrade than louder speakers.
Street Glide fitment shown: 2014–2023 Street Glide FLHX/FLHXS and 2022–2023 Street Glide ST applications listed on the product page.
View fitment & price
Klock Werks 8-Inch Red Kolor Flare Windshield
For newer Street Glide owners, this is the airflow-and-style move. It uses the Flare shape but keeps the cockpit looking custom.
Street Glide fitment shown: 2024–2025 Street Glide FLHX and 2023–2025 CVO Street Glide fitment listed on the product page.
View fitment & priceIf visibility is the complaint: upgrade functional light first
Visibility upgrades should make the bike easier to read in traffic. That means headlight aim, headlight output, front running/turn light function, rear brake/turn visibility, and side visibility before purely cosmetic accent lighting.
Street Glide lighting order:
- Confirm headlight aim and lens condition.
- Upgrade the headlight if the night beam is weak.
- Add front white/amber function so drivers see the width of the fairing.
- Add rear running/brake/turn lighting if traffic closes on you quickly.
- Use accent lighting last, after functional lighting is handled.

Custom Dynamics Shark Demon Performance LED Headlight
Use this if the first visibility complaint is actually seeing the road. The product page describes a plug-and-play kit with high-performance LED output and a sealed lamp assembly.
Street Glide fitment shown: 2007–2023 Street Glide FLHX/FLHXS plus 2006 Street Glide FLHXI and 2010 / 2015–2022 CVO Street Glide applications listed on the product page.
View fitment & price
Custom Dynamics ProBEAM 7-Inch LED Headlamp
Good comparison point if you want a single round LED headlamp with a chrome look and plug-and-play style installation.
Street Glide fitment shown: 2006–2023 Street Glide FLHX/FLHXS, 2006 Street Glide FLHXI, 2022–2023 Street Glide ST, and 2015–2022 CVO Street Glide applications listed on the product page.
View fitment & price
Custom Dynamics Genesis 4 Batwing Fairing Vent Insert
Use this when drivers do not read the front of the bike clearly. White running light plus full-contrast amber turn signal function is more useful than accent-only lighting.
Street Glide fitment shown: 2014–2023 Street Glide FLHX/FLHXS, 2015–2022 CVO Street Glide, and 2022–2023 Street Glide ST applications listed on the product page.
View fitment & price
Custom Dynamics Batwing Windshield Trim
Another functional front-lighting option with white running light and amber sequential turn-signal presence across the top of the batwing fairing.
Street Glide fitment shown: 2014–2023 Street Glide FLHX/FLHXS, 2015–2022 CVO Street Glide, and 2022–2023 Street Glide ST applications listed on the product page.
View fitment & price
Custom Dynamics Low-Profile LED Saddlebag Lights
Use this when you want the rear of the bike to be easier to read in traffic. The product page lists running, brake, and customizable turn-signal functions.
Street Glide fitment shown: 2024–2025 Street Glide FLHX/FLHXS, 2025 Street Glide Ultra, and 2023–2025 CVO Street Glide applications listed on the product page.
View fitment & priceIf sound is the complaint: decide between stereo sound and exhaust sound
“I want better sound” can mean two different things on a Street Glide. You might want a better stereo, or you might want a deeper exhaust tone. Those are different builds, and mixing both at once can waste money fast.
For stereo complaints, fix wind first. If the shield is throwing turbulent air into your helmet, the speakers will fight wind roar no matter how expensive they are. After airflow is controlled, choose a matched speaker and amplifier kit for your exact year range and factory radio setup.

Kicker 6.5-Inch Speaker / 300 W Amplifier Kit
A clean first audio step when you want factory-radio integration, a speaker/amp package, plug-and-play harnessing, and minimum cutting.
Street Glide fitment shown: 2014–2024 Street Glide FLHX/FLHXS, 2015–2022 CVO Street Glide, and 2022–2023 Street Glide ST applications listed on the product page.
View fitment & price
Wild Boar Audio WBA 800.4SG Speaker / Amplifier Kit
This is not the first move for every rider, but it makes sense when you want a larger audio plan: fairing speakers, saddlebag lids with 6x9 speakers, and two amplifiers.
Street Glide fitment shown: 2014–2023 Street Glide FLHX/FLHXS and 2022–2023 Street Glide ST applications listed on the product page.
View fitment & price
Rockford Fosgate Street Glide Stage 2 Audio Kit
For older Street Glide owners, a year-specific audio kit prevents mismatched speakers, amps, grilles, and wiring.
Street Glide fitment shown: 2006 Street Glide FLHXI and 2007–2013 Street Glide FLHX/FLHXS applications listed on the product page.
View fitment & price
Boss Audio BHD3F Front Audio Kit
A front-kit direction for riders who want speakers, amplifier, grilles, harness, hardware, and mounting pieces together instead of mixing parts one at a time.
Street Glide fitment shown: 2006–2021 Street Glide FLHX/FLHXS, 2010 / 2015–2021 CVO Street Glide, and multiple batwing Touring applications listed on the product page.
View fitment & priceIf the sound complaint is exhaust tone, do that as its own plan. Decide whether you want slip-ons for tone or a full intake/exhaust/tune path for performance. Do not buy loud mufflers to fix weak stereo volume, and do not buy a huge stereo because the windshield is making the cockpit too loud.
Shop Street Glide audio options Shop exhaust options
Three first-stage Street Glide build paths
1. The highway comfort build
Best if your complaints are tailbone pressure, back fatigue, wind noise, helmet shake, cramped knees, or passenger complaints.
- Baseline tire pressure, preload, seat position, and windshield height.
- Choose the right seat: standard reach, extended reach, or two-up touring comfort.
- Fix wind with a Street Glide-fit windshield.
- Check bar reach and wrist angle.
- Upgrade suspension only after setup and rider triangle are known.
- Add audio after the cockpit is quieter.
2. The commuter visibility build
Best if you ride in traffic, at dusk, at night, in rain, or around distracted drivers.
- Set headlight aim.
- Upgrade headlight output if the beam is weak.
- Add front white/amber running and turn signal presence.
- Add rear run/brake/turn lighting.
- Use accent lighting only after functional lighting is handled.
- Choose comfort upgrades for daily use, not only for looks.
3. The sound build that does not waste money
Best if the real complaint is stereo clarity, highway volume, or exhaust tone.
- Decide: stereo sound or exhaust sound.
- For stereo, fix wind first.
- Choose a matched speaker and amp kit for your exact year and fairing.
- Verify whether a radio reflash is required.
- For exhaust, choose slip-ons for tone or plan intake/exhaust/tune together for performance.
- Do not build big audio and loud exhaust at the same time unless the budget supports both correctly.
Common Street Glide first-stage mistakes
- Buying the seat with the best-looking stitch before deciding whether you need standard reach or extended reach.
- Buying a big amp before fixing wind roar.
- Using a Road Glide audio or lighting kit on a Street Glide because the year looks close.
- Assuming a 2014–2023 Street Glide part fits a 2024–2026 Street Glide.
- Buying cosmetic lighting before brake, turn, and running-light function is improved.
- Ignoring tire pressure and rear preload on a loaded Touring bike.
- Buying exhaust tone when the real complaint is fatigue, wind, or stereo clarity.
Quick buying rules by complaint
Tailbone pressure: compare seat pocket shape, foam/gel construction, and how the seat spreads weight.
Lower-back fatigue: compare lumbar support, stepped seats, and rider triangle before changing suspension.
Cramped cockpit: look at extended-reach seating before bars.
Helmet shake or wind roar: shop Windshields & Fairings before audio.
Weak stereo at speed: fix airflow, then shop Audio Communication & Mounts by exact year.
Hard to see at night: compare headlight output, beam pattern, and plug-and-play fitment.
Drivers do not notice you: prioritize front white/amber lights and rear run/brake/turn lights.
Too quiet: shop Exhaust, but separate tone from performance planning.
FAQs
What should I upgrade first on a Street Glide?
Upgrade the part that fixes your biggest complaint. Comfort complaints usually point to the seat, rider triangle, windshield, preload, or suspension. Visibility complaints point to headlight, turn-signal, brake-light, and running-light function. Audio complaints should start with wind control, then a matched speaker and amplifier kit.
Should I upgrade Street Glide audio or windshield first?
If wind noise is the reason you cannot hear the stereo, upgrade the windshield or airflow setup first. A stronger amp cannot fully overcome a noisy helmet pocket.
Are 2014–2023 Street Glide parts the same as 2024-up Street Glide parts?
No. Many seats, windshields, lighting kits, and audio kits split by generation. Always verify exact Street Glide year and submodel before ordering.
Are Street Glide ST and CVO Street Glide parts always the same as standard Street Glide parts?
No. Some products list standard Street Glide, Street Glide Special, Street Glide ST, CVO Street Glide, or Street Glide Ultra separately. Fitment matters even when the parts look similar.
What lighting upgrades matter most for a Street Glide?
Start with headlight aim and headlight output, then add front running/turn visibility and rear run/brake/turn visibility. Cosmetic accent lighting should come after functional visibility.
Do I need to upgrade exhaust in the first stage?
Only if exhaust tone is the complaint. If the ride is uncomfortable, noisy in the helmet, hard to see at night, or weak on stereo clarity, exhaust should wait.
The simple rule
Build the first stage around the complaint, not the category. If the bike hurts, build comfort. If drivers do not notice you, build visibility. If the music disappears, fix wind and then build audio. If you want more character, plan exhaust as a separate sound decision.
Write down your top two Street Glide complaints, match each one to the right upgrade path, then shop by exact year and submodel. That is how you build a better Street Glide without wasting money on the wrong first part.
Shop seats Shop windshields Shop lighting Shop audio Shop sale
Fitment reminder: the product recommendations above are Street Glide-fit according to the linked SpazCycle product pages, but exact fitment can change by year, submodel, CVO/ST trim, factory audio system, existing accessories, and prior modifications. Always verify before ordering.
Leave a comment