
Harley Touring Lighting Upgrades: What to Fix First When Night Riding Feels Sketchy
Harley Touring lighting upgrades should start with the part of the ride that actually feels sketchy. If you are backing out of the throttle because the road disappears, that is a different problem than drivers not seeing your turn signal, or a passenger telling you the bike disappears from behind at night. The right upgrade order is not “buy every LED on the page.” It is front beam first, then front recognition, then rear brake and turn visibility, then Tour-Pak or side lighting if your setup needs it.
SpazCycle parts-counter rule: fix functional lighting before cosmetic lighting.
- Can you see far enough? Check headlight aim, lens condition, output, and fairing-specific fitment.
- Can traffic read the front of the bike? Add white running light and amber turn signal presence.
- Can traffic read the rear of the bike? Improve run, brake, and turn signal function before adding accent lights.
- Do you run a Tour-Pak or ride two-up? Add higher rear lighting and side/rear visibility where it actually helps.
- Only then chase style lighting. Color, halos, and accents are great when the bike is already easier to see and understand.
Harley Touring lighting upgrades start with the beam you actually ride by
If night riding feels sketchy because you cannot comfortably see the road at highway speed, do not start with turn signals or accent lights. Start with the headlight and the setup around it.
Before buying parts, do the no-parts checks first:
- Clean the headlight lens and windshield area.
- Check headlight aim with the bike loaded the way you actually ride.
- Inspect the mounting, trim ring, fairing, and brackets for looseness.
- Check battery health and charging output if the lights flicker or dim at idle.
- Confirm whether your bike uses a 7-inch round headlamp, a Road Glide headlamp assembly, or a newer model-specific lighting setup.
That last point matters. A Street Glide, Electra Glide, Road King, Tri Glide, and Road Glide do not all shop from the same headlight bucket. Road Glide riders especially need to slow down and verify year range, because the shark-nose fairing changes the whole front lighting conversation.
When the road disappears: headlight first
If you are out-riding the light, the fix is usually beam pattern, aim, or both. A brighter part that throws light in the wrong place is not a good night-riding upgrade. You want a beam that gives you usable distance straight ahead without losing the shoulder and ditch area.
For 7-inch Touring applications, a headlamp upgrade can be the first meaningful fix. For Road Glide models, choose a Road Glide-specific headlamp assembly instead of trying to force a round-headlight answer onto a different fairing. This is where browsing by exact year and trim in SpazCycle’s Lighting collection matters.
When traffic does not notice you: add front width and clear turn signals
A good headlight helps you see. Front running lights and turn-signal upgrades help other drivers understand what the bike is doing. On a dark road or in traffic, one bright center light can still make a big Touring bike look narrow. Adding controlled white running light and amber turn signal function can make the front of the bike easier to read without turning it into a light show.
Road Glide riders can look at fairing-specific pieces like a white LED light bar or vent lighting, depending on the year. Street Glide and other Batwing-style Touring riders should look at windshield trim and turn-signal options that match their fairing. For 2024 Road Glide FLTRX/FLTRXS and 2023–2024 CVO Road Glide FLTRXSE models, the CIRO Fairing Vent Lights are a better year-specific direction than older Road Glide vent insert parts.
When the car behind you is the worry: rear lighting moves up the list
Rear lighting is easy to under-prioritize because the rider does not stare at it while riding. But if your night-riding concern is traffic stacking up behind you, brake and turn visibility should be fixed before decorative side glow.
The best rear upgrades are the ones that make your signals easier to understand: running light, brake light, and turn signal function. On Touring bikes with a Tour-Pak, higher rear lighting can also help because it puts a brake light closer to eye level for following traffic. On Ultra Limited, Road Glide Limited, and Tri Glide style setups, a Tour-Pak module like the Custom Dynamics MAGIC-TPC-LED Tour-Pak Run/Brake/Turn Signal Module can make sense, but only if the bike matches the Tour-Pak LED side-arm requirements and stock light operation notes.
Parts that match the complaint
Use these as examples of how to shop the problem, not as a one-size-fits-all list. Check the product page fitment against your exact Harley-Davidson year, trim, fairing, and luggage setup before ordering.
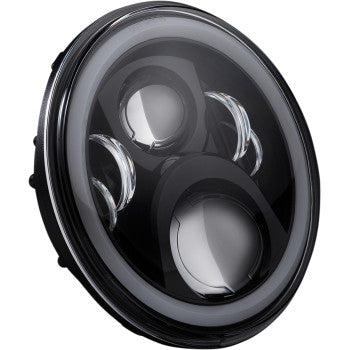
If the beam is the weak spot: Custom Dynamics 7-inch Halo Headlamp
This is the direction to look if your Touring bike uses a 7-inch headlamp and your complaint is usable forward light. The page lists Touring fitments including Street Glide, Electra Glide Ultra Limited, Tri Glide, Road King, and Road King Special applications.
Tradeoff: this is not the answer for a standard Road Glide shark-nose fairing. Road King and Freewheeler applications may require the listed additional wiring adapter.

If you ride a Road Glide: Custom Dynamics TruBEAM FLTR Headlamp
Road Glide lighting is its own fitment lane. This TruBEAM assembly is built for FLTR applications and is listed for 2015–2023 Road Glide FLTRX/FLTRXS, 2016–2019 Road Glide Ultra, 2020–2024 Road Glide Limited, 2022–2023 Road Glide ST, and other listed Road Glide models.
Best for: Road Glide riders who want to address the main forward beam instead of adding small lights around a weak headlight.

If the front looks too narrow: Road Glide White LED Light Bar Kit
This is a Road Glide-specific front visibility add-on with six high-power LEDs, a stainless bracket, built-in on/off switch, and plug-and-play harness.
Fitment note: listed fitments include 2015–2023 Road Glide FLTRX/FLTRXS, 2016 Road Glide FLTR, 2016–2019 Road Glide Ultra, 2020–2024 Road Glide Limited, and listed CVO/ST Road Glide applications.

If you want the front to read wider: Genesis 4 Batwing Windshield Trim
This trim adds white running light and amber sequential turn signal function across the windshield area. It is a smart visibility-style upgrade when the front of the bike needs more readable width.
Fitment note: the page lists Street Glide, Electra Glide, Tri Glide, Street Glide ST, and other Touring fitments. Check carefully before using it on any Road Glide Limited application.
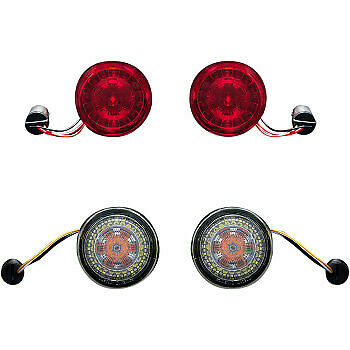
If the signals are hard to read: ProBEAM Front and Rear Conversion Kit
This kit attacks both ends of the bike: white DRL and amber turn signal function up front, plus red running, brake, and turn signal function at the rear.
Good match for: 2014–2023 Street Glide, 2015–2023 Road Glide FLTRX/FLTRXS, 2016 Road Glide, and 2017–2024 Road King Special applications listed on the product page.

If you run a Tour-Pak: High Mount Tour-Pak LED Light
A high rear light can be more useful than another low accent strip. This Tour-Pak lid light adds rear visibility with run and brake lighting, plus red turn signal function on most models.
Fitment note: built for stock LED King Tour-Pak models and add-on 2014–2023 King or Chopped Accessory Tour-Pak setups. Confirm your Tour-Pak before ordering.
Do not let style lights jump the line
There is nothing wrong with accent lighting when the bike is already sorted. The problem is buying style first when the actual complaint is safety, fatigue, or uncertainty at speed. A color-changing accent does not fix a poorly aimed headlight. A smoked lens does not help if the turn signal gets lost in traffic. A rear fender light that looks good in a photo still needs to be easy to understand when a car is closing on you.
If you are working with a budget, check SpazCycle’s Sale / Open Box collection after you know the exact part you need. Open-box lighting can be a good deal, but availability is usually limited and fitment still matters more than price.
Fitment details that matter on Harley Touring lighting
Lighting fitment is one of those categories where “Harley Touring” is not specific enough. Before adding anything to the cart, match the part to the details that change the install:
- Fairing type: Batwing, Road Glide shark-nose, Road King nacelle, and Tri Glide setups do not always share parts.
- Year split: 2014–2023, 2015–2023 Road Glide, and 2024-up Touring models can be very different.
- Tour-Pak setup: stock King Tour-Pak, chopped accessory Tour-Pak, add-on luggage, and no Tour-Pak all point to different rear lighting choices.
- Connector and BCM behavior: plug-and-play still needs the correct harness, and some modules call out BCM or stock light-function requirements.
- Lens choice: smoke lenses can look cleaner, but the real question is whether the running, brake, and turn signal function is easy to read.
When in doubt, shop by exact year and submodel, then compare options inside the broader Custom Dynamics Lighting collection or SpazCycle’s full Lighting collection. Do not assume a Road Glide part fits a Street Glide, or that a Street Glide trim piece belongs on a Road Glide just because both are Touring bikes.
The best first move
For Harley Touring lighting upgrades, the best first move is the one that fixes the reason night riding feels sketchy. If you cannot see far enough, start with headlight aim and the correct headlamp for your fairing. If traffic does not seem to notice you, add front running and turn-signal visibility. If the worry is the car behind you, prioritize rear run, brake, and turn function. If you ride with a Tour-Pak or passenger, consider higher rear lighting before cosmetic accents.
Shop note: lighting is not the place to guess fitment. Use the product page fitment list, match your year and trim, and call SpazCycle if your Touring bike has a mix of factory and add-on lighting.
Leave a comment